BabysRoomOnline.com is no longer offering products
If you are looking for BabysRoomOnline.com you are in the right place, however, our supplier discontinued our products and we are no longer able to offer them, we have started a new venture called prophetpaintings.com
You can view our new site at:
http://www.prophetpaintings.com or our blog http://prophetpaintings.wordpress.com for our blog.
We appreciate your support over the last 2 years please let us know if you have any questions
support@prophetpaintings.com
americansaturdayinc@gmail.com
Trent and Camille Bowen
Read Full Post | Make a Comment ( None so far )
Keyboard ABC’s
I am trying to teach Bridger his ABCs. We sing the ABC song, use the colors, letters and shapes can, and identify letters on pages. I also discovered another way to teach ABC’s and also learn very basic computer skills.
We have a desktop computer that Bridger loves to sit at and play with the keyboard and mouse. I have not let him use the computer when it is on yet, but I though I would start teaching him where things were on the keyboard.
We started singing the ABC’s while pushing the corresponding buttons on the keyboard, while the computer was off. That way he can see the letters as we sing them as well as learn where they are on the computer keyboard. Eventually we will type with the computer on and learn to do other things as well.
Read Full Post | Make a Comment ( None so far )
“Learning Can”
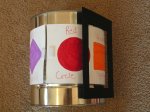
I was trying to think of a fun way to teach my toddler basic shapes, colors and letters. I devised this “Learning Can” to use both sight and physical interaction to learn basic concepts. Once the can is finished, use the black frame to choose a shape/color or letter/color combination. Have your child find things of that shape or color or that start with the letter to put in the bucket.
Materials:
- 1 #10 can or other gallon-size can
- Scissors and/or a paper cutter
- 2 pieces white cardstock
- 1 piece black cardstock
- packing tape
- self-adhesive velcro (available in office supply or craft stores)
- a pencil and markers: red, orange, yellow, green, blue, indigo, violet
- Items to help draw shapes (small square, circle, rectangle items)
- Sewing tape measure
Directions:
- Cut the two pieces of white card stock in half so you have four pieces each 4.25 by 11 inches.
- Tape two pieces together so you have two long pieces of paper about 4.25 by 22 inches. Only put tape on one side of the paper so you can color on the other side.
- Measure and the two pieces of paper so the are as long as the can is around. When you put the papers around the can, the ends should touch. Make sure you cut the two papers the exact same size.
- On one paper, draw seven shapes: circle, square, rectangle, star, heart, triangle, and diamond Use the tape measure to make sure they are about the same size and distance apart.
- Color each shape a color of the rainbow and label with the color and name of the shape.
- On the other piece of paper, write the alphabet in rainbow colors. Put half the alphabet on top, and flip the paper over to write the other half.
- Put the two papers together so they are back to back and tape them together. Put tape around the parts that were taped together before so they do not come apart.
- Cut the black paper so it fits like a belt buckle around the papers. Thread the paper through it so it forms a window around one shape at a time.
- Put a velcro piece on the can, and then cut the matching velcro piece into four pieces. Put one on each end of the papers, so there is one on each end on both sides.
- Velcro the paper to the can, and you can flip it around to do shapes on one side, and the alphabet on the other.


Read Full Post | Make a Comment ( 1 so far )
Snowflake Mobile
Items Needed:
- 1 hanger
- yarn
- scissors
- milk jug
- hole punch
- white paper
Directions
- Cut to rounded triangles from the bottom of the milk jug, then cut two circles from the sides
- Punch two holes from in the middle of the circles. Make a small cut with your scissors on each side of the triangles (3 cuts per triangle).
- Punch 3 evenly spaces holes around the outside of the circle, and on each corner of the triangle (three holes per plastic shape).
- Using the scissors, make a hole through the middle of the milk jug cap.
- Cut one really long string of yarn and eighteen medium length strings of yarn. It is ok if they are not exact.
- Make 13 snowflakes: 6 small, 6 medium, and one large.
- Take the long string of yarn and put it through the milk jug lid. Tie the top to the middle of the hanger, tie the bottom to the large snowflake.
- Tie each of the snowflakes with the medium length strings.
- Attach one snowflake to each hole you made in the plastic shapes.
- Tie the two plastic circles to the bottom of the hanger passing yarn through the holes in the middle. Attach them on either side of the yarn already attached to the hanger.
- There should be four remaining strings. Put a knot at the end of two of them. Attach the knotted end of each string to one of the slits on each triangle. Loop the other strings through the other two slits of the other triangles. You should have three strings to hold up the triangles making them hang down and give the snowflakes a 3D effect. Attach the triangles to the ends of the hanger.
- Display your creation for all to see!

Read Full Post | Make a Comment ( None so far )
Creative Reading
Has your toddler ever wanted you to read the same book over and over again? My son will stay with the same book for sometimes 10-20 minutes. I have found a few things that help keep things interesting, and keep his interest. My son’s favorite is counting. Anything and everything that can be counted, we count it. Sometimes he will take my hand, put his hand in it and have me move his hand over various items to count them.
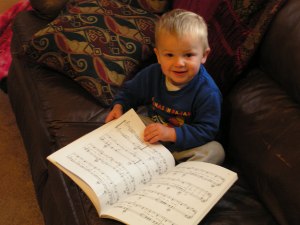
We also go through and identify colors and name objects. It’s a great way for him to learn and for us to spend quality time. Bridger also likes to look through music books. He just sits on the couch and pages through them.
Read Full Post | Make a Comment ( None so far )
Thanksgiving Centerpiece
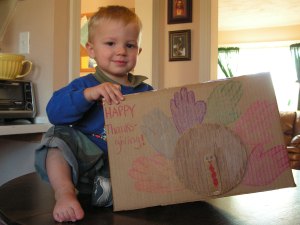
Here’s a Thanksgiving decoration your kids can make. I had my 18-month-old help me and he had so much fun he was mad when we were finished!
You will need: 1 rectangular box (I used a diaper box), a large circular container or lid (I used a #10 can) scissors, crayons, a stapler, and packing tape
To start, cut the bottom and top off the box so it’s just the sides. Cut one of the long sides off, so you have one long side remaining with a short side attached on both sides. On the side you cut off, trace a circle and cut it out. This will be the body of a turkey. Cut out a long oval shape for the turkey head and neck (I used the section of cardboard that comes apart from the box handles. Color the circle brown, and draw a turkey face and gobble on the oval piece.
On the long side of the 3 section cardboard piece, trace a circle in the middle bottom of the box (use the same circle pattern as for the turkey body). Using your child’s hand, trace hand patterns around the circle and color them in. Staple the turkey neck to the front of the turkey body. Tape the turkey body into the circle pattern. Write Happy Thanksgiving on the top or side if desired.
Take the two side pieces and tape them together in the back so it will stand alone. Display at your Thanksgiving activities and dinner!
Read Full Post | Make a Comment ( None so far )
Bubbles Bubbles Bubbles!
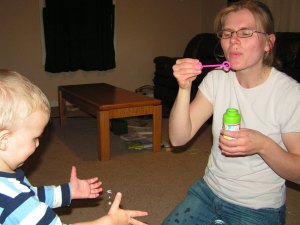
This toddler activity should be supervised! I had lots of fun with Bridger pulling out some bubbles. Sometimes he held the little stick while I blew into it, but mostly he just had a blast chasing the bubbles around. Bubbles are easy to find if you have a dollar store nearby, and they can be tons of indoor and outdoor fun.
Read Full Post | Make a Comment ( None so far )
Raking the Leaves
A great way to maximize the beatiful fall weather is spending some time out in the leaves. Rake them, jump in them, crush them, or just throw them around. This activity is good for kids and adults of all ages. It is fun, refreshing, and a great way to get some exercise.
Read Full Post | Make a Comment ( None so far )
Hidden Toy
This toddler activity can have several variations and target different skill levels. The basic activity requires three empty containers with lids, and one object or toy. Show the toy to your child, then hide it in one of the containers and mix them around. Have the child guess where the toy is. My son got really excited when he found his toy, and then had fun playing with the containers
You can use different colored containers and ask questions like, “Is it in the blue container?” You can use different sized containers and ask, “Is it in the big or small container?”
Read Full Post | Make a Comment ( None so far )
Shake-O-Lanterns
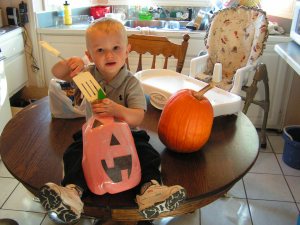
Here’s a fun halloween craft that recycles a milk jug.
Materials:
- Empty, rinsed out milk jug
- Orange paint or food coloring (I mixed red and yellow acryllic paint)
- Water (1/4-1/2 cup)
- Paper Bag or brown paper
- Black and green construction paper ( I used black marker and part of a green box)
- Packing tape
- Scissors
Directions:
1. Make sure the milk jug is rinsed and dry on the outside.
2. Put a small amount of water in the jug, enough to cover the bottom.
3. Place the paint or coloring into the jug. You can put it on the inside of the lid and then place the lid on the jug.
4. Shake the jug and see if it is the color you want. When you shake, orange color should coat the jug.
5. Secure the lid to the jug with packing tape. Put brown paper around it to form a stem. Add a green leaf if desired.
6. Cut out a black Jack-O-lantern face and tape it to the jug. I put packing tape over the face pieces to secure it.
7. Give it a shake and see your Shake-O-Lantern turn orange!
This is one your toddlers can carry around.
Read Full Post | Make a Comment ( 1 so far )
Table Time
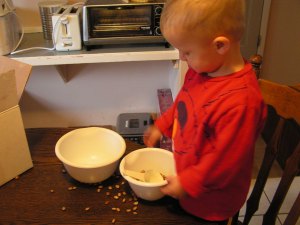
My sister called and told me about this toddler activity, and it saved my sanity today. Bridger was throwing fit after fit as he was following me around the house while I was doing chores, because he wanted to get into things he shouldn’t. Finally, we came to the kitchen and I sat him up to do some “table time.” Basically, this is structured time sitting at the table with a task or activity.
The task or activity should be one that is only done at “table time” so your toddler knows what to expect. Since we had never done this before, I got out two bowls, a measuring cup, and some dry beans. I showed him how to scoop the beans from one bowl to the other and then handed him the items. He had a blast for a good 20 minutes, which allowed me to compete some much needed tasks.
The benefits of “table time” are development of dexterity, learning task completion, and preparing for kindergarten
Read Full Post | Make a Comment ( None so far )
New Look for BabysRoomOnline!
We have recently revamped our website and our now offering a variety of new products including baby monitors, bedding with matching mobiles, bouncers, and much more. Come check it out and find a great product for you and your baby.
Read Full Post | Make a Comment ( None so far )
Diaper Box Car
Bridger and I had a blast fixing up one of the diaper boxes we had sitting around. All you need is 1 diaper box, some crayons and markers, about 13 pieces of 8 1/2 X 11 paper, scissors, and packing tape.
1. Cut the 4 top pieces off
2. Bend the two long pieces to form the front and rear “bumpers”
3. Use a cup or free hand two wheels from each of the smaller top pieces (You should end up with 4 wheels)
4. Cover the two longs sides of the box, and the two bumper pieces with paper. Attach the two bumper pieces.
5. I taped a piece of paper on each side to form a front and back windshield.
6. Color and attach the four wheels, and then decorate the car.
7. I made a steering wheel using 3 pieces of rolled up paper. I also did the front and rear lights using rolled up red paper.
8. Ride around the room yelling “Vroom, Vroom, Vroom!”
Read Full Post | Make a Comment ( None so far )
Swat the Mosquito
Another fun family game is called “Swat the Mosquito.” The “it” person is blindfolded and holding a rolled up newspaper. Everyone else walks around making buzzing sounds. The “it” person tries to swat the “mosquitoes” with the newspaper. If someone gets swatted, he or she becomes “it.”
Read Full Post | Make a Comment ( None so far )
Capratika!
When we were little, my dad used to give us “pratikas.” He would lie down on the floor with his knees bent so we could sit on them. As we sat on his knees, he would say “Capratika…..capratika….capratikaaaaaaaaaa……….Kerplunk!” As he said “kerplunk” he would open his knees and we would fall to the floor. This toddler game is a good exercise for parents, and lots of laughs for kids. My son loves to do this.
Read Full Post | Make a Comment ( None so far )
Upset the Fruit Basket
This is a fun family activity that can also be done with any group. To play the game, each person has to be labeled as a fruit: apple, orange, banana, etc. You should have more than one person for each fruit. One person is “it” standing in the middle of everyone else who is sitting around the room. The “it” person shouts out one or two fruits. The people who are these fruits must get up and switch seats. The “it” person tries to steal someone else’s seat. Whoever is left standing is now it. The “it” person, at any time, may call “upset the fruit basket.” Everyone has to leave their seat and find a new seat. Again, whoever is left standing is “it.”
Read Full Post | Make a Comment ( None so far )
Ducky Ducky
Growing up, my family has always had “family night” once a week. During this time we would always play games. One of these was called “Ducky Ducky.”
You need a blind fold and a pillow. Everyone sits around the room, and the person who is “it” is blindfolded and holding the pillow. “It” person goes around the room to find a lap to sit on using the pillow to feel. “It” person sets the pillow on a lap, and says “Ducky Ducky.” The person being sat on tries to disguise their voice and responds “Quack, Quack.” If the “it” person guesses who it is, the person being sat on is now it. If the guess was incorrect, the “it” person continues until he guess correctly. We had lots of laughs with this one!
Read Full Post | Make a Comment ( None so far )
Bowling
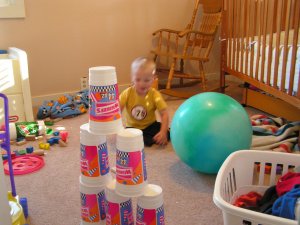
I have lots of gas station refill cups that were given to me, and my son loves to play with them. This morning, we invented a toddler game version of bowling. We stacked the cups on top of each other in a pyramid shape, then took his big bouncy ball and rolled it into them. He had fun both rolling and throwing the ball, as well as just knocking the cups down himself.
Read Full Post | Make a Comment ( None so far )
Playing in the Park
For a while, I wasn’t doing much outside with my son, and then I realized the warm weather was almost gone, so I started taking a daily trip to the park with my son. After a few days, he came to expect it and want to be outside more often. Since he is too young to be on the equipment himself, and I don’t have the energy to spend the entire time climbing on it with him, we bring a bucket and shovel. After we play on the swings and slides, I let him have his bucket and shovel and he spends half the time digging in the woodchips.
Read Full Post | Make a Comment ( None so far )
Edible Play Dough
My son absolutely loves to play in and eat dirt, rocks, sticks, and anything else he can pick up off the ground. Another way to let your child get that gooey feeling on their hands, and not worry about whether or not they eat it, is edible play dough. A very basic recipe that is easy and uses items you probably have on hand is for an oatmeal dough.
OATMEAL DOUGH
Ingredients:
1 part flour
2 parts oatmeal
1 part water
Directions: Mix ingredients together and form into shapes. Note: The items made from this play dough recipe can be painted when they are dry.
For more fun recipes, visit http://www.childfun.com and search the site for edible play dough.
Read Full Post | Make a Comment ( None so far )
Music Time
My sister and her husband both have music degrees, and her children love to make their own music. She just turns on a CD and gives her kids some instruments like drums or morraccas. If you don’t have any instruments, take a bowl and give your child a spoon. Or for easy shakers, take a yogurt cup with a lid, or other small container with a lid and put rice, beans, or some other small shakable objects inside. Turn on some music and have a blast!
Read Full Post | Make a Comment ( None so far )
